
How to Plan a Professional Video Production Shoot
Planning a professional video shoot starts long before the cameras roll. The key to a smooth production is pre-production, where decisions about goals, messaging, locations, equipment, and schedules are made. Here’s what you need to know:
Define Goals & Audience: Be clear on what the video should achieve and who it’s for.
Script & Storyboard: Write a concise script, create a visual storyboard, and organize a shot list.
Assemble a Team: Assign clear roles (e.g., producer, director, audio engineer) and ensure everyone’s aligned.
Choose Equipment: Select gear that matches your project needs and test everything beforehand.
Scout Locations: Visit sites, check lighting and noise, and secure necessary permits.
Build a Schedule & Budget: Plan timelines, allocate resources, and set aside a contingency fund for unexpected issues.
Pre Production | 5 Effective Steps For Videographers
Define Your Project Goals and Scope
Before you hit record, there’s one crucial question to answer: what is this video meant to achieve? The success of your video often hinges on the clarity of your purpose at this stage. Whether your goal is to inform, entertain, inspire, or persuade, trying to accomplish all of these at once is a recipe for failure.
Identify Your Goals and Audience
Start by pinpointing your video's main objective. Are you looking to boost brand awareness? Educate your audience on a specific topic? Highlight a product? Or perhaps generate leads? Each goal requires a different approach. For instance, a training video for employees will look and feel very different from a polished brand film aimed at investors.
Equally important is understanding who your audience is. Tailor your content to their needs and preferences. Consider this: 70% of B2B buyers engage with video content during their purchasing process, and 96% use video to learn about products or services. For B2B projects, it helps to answer these three questions early on: Who are you? Why should your audience care? Why is this relevant now?
"Strategy work usually accounts for 20 to 30% of total project time. That investment prevents costly revisions, misaligned messaging, and the scope creep that can derail production later."– Andrew Crichton, Founder of Levitate Media
This initial discovery phase is the foundation that ensures everything else stays on track.
Once you’ve nailed down your goals and audience, it’s time to define your message and tone.
Determine Key Messaging and Tone
With your goals and audience in mind, focus on one or two core messages. This step requires discipline. It’s tempting to include every feature, benefit, and selling point, but overloading your video will only dilute its impact. As movingimage explains:
"Cramming in too many benefits will dilute the impact - and leave your audience remembering little or nothing."– movingimage
The numbers back this up: viewers retain 95% of a message when delivered via video, compared to just 10% when reading text. But this level of retention only happens if your message is clear and singular. Short B2B videos under 90 seconds, for example, maintain an average retention rate of 58%, proving that brevity and focus are key.
Your tone should reflect both your brand identity and your audience’s expectations. A briefing sheet that outlines your target audience, platform, and "one key message" can help keep everyone aligned from the beginning. For industries like healthcare or finance, where trust is paramount, a documentary style often works best. On the other hand, companies aiming to establish themselves as leaders in their field might benefit from a more cinematic approach. The tone you choose here will influence every creative decision moving forward - from lighting and music to editing style.
These strategic choices lay the groundwork for all the technical and logistical decisions that follow in your production process.
Develop Your Script, Storyboard, and Shot List
Turn your goals and messaging into actionable production materials that will guide your team through every step of the process.
Write a Detailed Script
Think of your script as the foundation for your entire production. Before diving in, ask yourself a few critical questions: What’s the main takeaway? What action do I want viewers to take? How will this improve their lives? These answers will shape your script.
Structure is everything. Start with a hook (0–5 seconds) to grab attention, follow with a compelling value proposition (5–30 seconds), then build a body that presents logical arguments supported by examples. Wrap it all up with a strong call-to-action that leaves no doubt about what viewers should do next.
For shorter professional videos (under five minutes), your script will likely be just one or two pages long. Format matters here. A two-column format separates visual cues from dialogue, while single-column scripts include visual notes in brackets. If you’re using a teleprompter, stick to an 18-point font with short lines and plenty of spacing to ensure readability.
Here’s a tip: write for the ear, not the eye. Use contractions like "don’t" or "can’t" to sound natural, start sentences with words like "And" or "But", and throw in rhetorical questions to keep it conversational. Always read your script out loud - it’s the best way to catch awkward phrases or timing issues. Then, edit ruthlessly. Cut at least 20% of your words to eliminate fluff and keep things tight. And don’t forget to focus on your audience: use “you” three to five times more often than “I” or “we” to keep the spotlight on them.
Once your script is polished, it’s time to visualize the scenes with a storyboard.
Create a Storyboard
A storyboard transforms your script into a visual guide for your production. Instead of mapping out every single shot, focus on the key scenes - especially those with complex compositions, unique angles, or pivotal emotional moments. For standard dialogue or straightforward shots, detailed visualization often isn’t necessary.
Your storyboard should be based on the screenplay’s action lines, dialogue, and blocking. It’s less about artistic perfection and more about ensuring clarity for your team, particularly your Director of Photography. Even a rough sketch can effectively convey framing, camera angles, and character placement.
In March 2026, Amit Timalsina, Co-founder of StoryBirdie, demonstrated the efficiency of AI storyboarding. Testing it across 50 scenes from different genres, the AI completed storyboards in about 12 minutes per screenplay - compared to the 4–8 hours typically needed for hand-drawn boards. Roughly 70% of these AI-generated scenes were usable with only minor tweaks, especially for dialogue and straightforward narrative sequences. Costs ranged from $0.50 to $2.00 per scene.
"AI storyboarding in 2026 is a genuine productivity tool, not a gimmick. It handles the mechanical 70% of storyboarding work and frees you to spend your creative energy on the 30% that makes your project distinctive."– Amit Timalsina, Co-founder, StoryBirdie
Beyond saving time, storyboards help you catch potential issues - like character placement errors or disappearing props - before production begins. Addressing these details early can save both time and money during filming.
With your storyboard in place, the next step is organizing your shots for a smooth production day.
Prepare a Shot List
Your shot list bridges planning and execution. Unlike a storyboard, which follows the story’s sequence, a shot list is organized by production needs. Grouping shots by location, cast availability, and lighting conditions can help you avoid unnecessary location changes (known as "company moves") and make the most of available daylight.
For each shot, include the following details: scene number, interior/exterior (INT/EXT), day/night (D/N), location, cast, props, and required equipment. This level of detail ensures you won’t overlook anything on shoot day.
A well-structured shot list groups all scenes at the same location together, even if they appear at different points in the story. This saves setup time and keeps your production running efficiently. Be sure to note camera movements, lens choices, and any special requirements so your crew can prepare and execute with precision.
With a solid script, clear storyboard, and detailed shot list, you’ll be ready to bring your vision to life seamlessly.
Assemble Your Team and Select Equipment
With your script and shot list ready to go, it's time to gather your team and pick the gear that aligns with your project's goals. These steps are essential to bring your carefully planned production to life.
Identify Key Crew Roles
A well-organized crew is the backbone of any successful production. Assigning clear roles ensures that everything runs smoothly on set. Here are some of the key players you'll need:
Producer: Oversees the budget, schedule, and overall logistics to keep the project on track.
Director: Shapes the creative vision and ensures the team executes it effectively.
Audio Engineer: Captures clean, balanced sound.
Gaffer: Handles lighting design to set the mood and visual tone.
Grip: Manages camera support systems like tripods, dollies, and rigs.
Camera Assistant: Prepares cameras and lenses, assists with complex movements, and manages tasks like manual focusing.
Data Technician: Safeguards footage by transferring it from memory cards to multiple drives and preps cards for reuse.
For smaller productions, a Video Generalist might handle multiple roles, from shooting to editing. As Nolan Nichols, Manager of Video Production at the U.S. Travel Association, explains:
"For an in-house videographer, you're really hiring a cross country runner, somebody that is going to be able to take it the distance and navigate different terrains, but can take it from the start to the finish because there's nobody in-between to handle it."
Tailor your team to fit your project. For polished commercials, you'll want a cinematographer experienced in creating visually striking sets. If you're producing content for platforms like TikTok or YouTube, look for someone who understands those specific audiences and formats.
Choose the Right Equipment
Your choice of equipment plays a huge role in how your final product looks and feels. Lenses and lighting are particularly important for achieving the desired aesthetic, so select tools that align with the director's vision. Additionally, make sure your gear meets the technical specifications required for your deliverables, whether that's 4K resolution, specific aspect ratios, or other formats.
Reliability is key. Test your equipment before shooting to ensure everything works as expected. Always have backups - extra cameras, memory cards, and duplicate audio setups can be lifesavers if something goes wrong on set. If you're working with a tight budget, renting equipment can give you access to high-quality gear without a significant financial commitment.
To keep things organized, assign a team member to be responsible for each piece of equipment. This ensures accountability and avoids confusion during the shoot, especially for critical items like cameras and audio recorders.
Scout Locations and Plan Logistics
Picking the right location is a critical step in ensuring your production runs smoothly. A careful scouting process helps you sidestep unexpected issues and keeps everything on track.
Evaluate Locations for Suitability
Visit potential filming sites at the same time of day you plan to shoot. Lighting shifts throughout the day, and what looks ideal at noon might be completely different by late afternoon, with harsh shadows or difficult backlighting. While you're there, check for background noise - sounds like traffic, air conditioning, or construction can ruin your audio. Use headphones with a microphone to get an accurate sense of the ambient noise.
Pay close attention to the practical aspects of the location. Are there enough power outlets nearby? If not, you may need extension cords. Is the space large enough to accommodate your crew, equipment, and the action you're filming? Look out for visual distractions like reflective surfaces, harsh lighting, or cluttered areas that might clash with your video's tone. If the location feels dull but works otherwise, you can spruce it up with props, plants, or affordable backdrops from a local store.
Make sure to confirm with property owners or authorities about any events - like parades or construction - that could disrupt your shoot. While indoor locations offer more control over lighting and noise, outdoor shoots come with challenges like weather changes and unexpected passersby. A thorough location assessment ensures your production stays on schedule and aligns with your creative goals.
Manage Permits and Logistics
Once you've found a suitable location, securing the necessary permits is essential to avoid interruptions. Start the process early, as it can take time. Standard commercial permits generally take 5 to 7 business days to process, while permits for feature films may require 10 to 15 business days. Some areas offer expedited processing within 2 to 3 days for an extra fee. As StudioBinder explains:
"Obtaining permits upfront allows the team to focus on creativity and logistics, reducing disruptions".
Check with your local film commission to understand permit requirements. Public spaces typically need government permits, while private property requires a signed location release agreement from the owner. Always keep both digital and physical copies of your permits on hand during the shoot in case authorities request them. Additionally, you'll likely need liability insurance - $20 million in public liability coverage is a common recommendation.
Assign a logistics coordinator to handle transportation, equipment storage, catering, and crew schedules. Poor logistics planning can derail even the best-laid plans. Rob Nelson, Director at Untamed Science, emphasizes:
"If there's one thing that can quickly turn your well-intentioned film shoot into a chaotic mess at your location, it's poorly planned shoot logistics".
Build a Production Schedule and Budget
Build a Production Schedule and Budget
Video Production Budget Guide: Cost Breakdown by Project Type
Keeping your production on track requires a solid schedule and a well-planned budget. Every extra day on set means higher costs - think crew wages, location fees, equipment rentals, catering, and insurance. Getting organized upfront can save you a lot of money and headaches.
Create a Production Schedule
Start by breaking down your script. This process helps you identify everything that impacts your timeline and costs, like scene numbers, settings, and cast requirements. A helpful rule of thumb is the 1/8th page rule: one full script page typically equals about a minute of screen time. To streamline things, use a stripboard approach to group scenes efficiently. For instance, you can plan to shoot all your day exteriors while natural light is available or take advantage of the "Golden Hour" for those perfect lighting conditions.
Don’t forget to add buffer times for unexpected delays. A typical union shoot day lasts 10 to 12 hours, with mandatory rest periods of 8 to 12 hours between shifts. Schedule simpler scenes early in the shoot and save complex ones for when the team is fully warmed up. Interior scenes can also act as a backup plan if weather disrupts outdoor shooting.
Scheduling tools like StudioBinder can be a lifesaver. They help you build detailed calendars and generate call sheets automatically. Send out call sheets ahead of time so everyone knows what to expect [29,30].
"A shooting schedule that is organized efficiently can shave days off a shoot, saving tens of thousands of dollars on a low-budget indie or hundreds of thousands on a studio project".
Once your schedule is locked in, it’s time to create a budget that aligns with every phase of production.
Develop a Budget
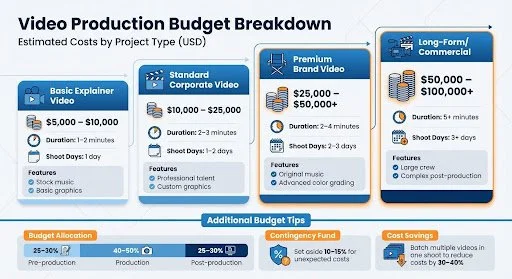
Your budget should reflect the needs outlined in your production schedule. Typically, the budget is split into three main phases: 25–30% for pre-production, 40–50% for production, and 25–30% for post-production. Since crew-related costs often make up 40–60% of the total budget, an efficient schedule is critical to managing expenses.
Here’s a quick breakdown of estimated costs for different video types:
| Video Type | Estimated Cost Range (USD) | Features |
|---|---|---|
| Basic Explainer | $5,000 – $10,000 | 1–2 minutes, 1 shoot day, stock music, basic graphics |
| Standard Corporate | $10,000 – $25,000 | 2–3 minutes, 1–2 shoot days, professional talent, custom graphics |
| Premium Brand | $25,000 – $50,000+ | 2–4 minutes, 2–3 shoot days, original music, advanced color grading |
| Long-Form/Commercial | $50,000 – $100,000+ | 5+ minutes, 3+ shoot days, large crew, complex post-production |
Always set aside 10–15% of your budget as a contingency for surprises like bad weather or equipment issues. To cut costs, consider batching multiple videos in one shoot. This way, you can share setup, crew, and location expenses. Additionally, using a systems-based approach with reusable assets can reduce ongoing production costs by as much as 30–40%.
Managing cast availability is another key part of budgeting. A Day-Out-of-Days (DOOD) report helps track when actors are needed on set. This is especially important for actors on weekly contracts, as you may have to pay "hold" fees for days they aren’t actively filming.
Conclusion
Planning a professional video production shoot calls for careful preparation, teamwork, and an eye for detail. The pre-production phase often takes the most time, as it lays the groundwork for the entire project. As Matthew Hastie from Vidyard explains:
"Errors here [in pre-production] can cascade throughout the project and make the whole thing take longer".
Starting with a clear script, storyboard, and shot list is essential. This helps you capture all the footage you need while avoiding unnecessary mistakes that could cost time and money.
Team collaboration is another key factor. Your crew’s input can make a big difference - whether it’s an actor suggesting a tweak to a line or a camera operator spotting a better angle. Don’t overlook audio quality, either. Many filmmakers argue that sound is often more critical than visuals because audiences are much less forgiving of poor audio. Double-check that your equipment is working, batteries are charged, and lighting is on point.
It’s also smart to build a 20% buffer into your schedule to account for potential delays in travel, shooting, or editing. Simplify logistics by limiting the number of locations, and always use checklists to make sure nothing is missed on shoot day.
FAQs
-
Before committing to a crew or location, make sure to confirm essential details like the exact location and crew availability. Getting these nailed down early in pre-production helps keep your schedule on track and prevents unexpected conflicts. Finalizing these elements ahead of time reduces the risk of last-minute changes that could throw off your entire shoot.
-
When deciding whether to rent or buy, weigh these considerations:
Frequency of use: If you only need it occasionally or for a short-term project, renting makes more sense. For frequent or ongoing use, buying is usually the better choice.
Budget: Renting can help you avoid the high upfront costs of purchasing, while buying might be more cost-effective over time if you'll use the item regularly.
Technology updates: Renting allows access to the latest equipment without worrying about it becoming outdated, which can be a big advantage for tech-heavy needs.
In general, renting is ideal for occasional or specialized needs, while buying is the way to go if you need consistent access or long-term ownership.
-
Creating a realistic shoot schedule doesn't have to be overwhelming. The simplest approach is to use a production calendar or a scheduling tool to map out scenes, locations, and timing in an organized way. Start by breaking down the script and grouping scenes based on logic - like location or setup - rather than sticking to chronological order. This method saves time and minimizes unnecessary transitions.
To keep everything on track, rely on tools like shot list templates or scheduling software. These tools ensure tasks stay aligned, help you avoid delays, and make the most of each shooting day. A well-planned schedule means fewer hiccups and a smoother production experience.